UPDF for Windows
 UPDF for Mac
 UPDF for iPhone/iPad
 UPDF for Android
 UPDF AI Online
 UPDF Sign
 Edit PDF
 Annotate PDF
 Create PDF
 PDF Form
 Edit links
 Convert PDF
 OCR
OCR PDF to Word
 PDF to Image
 PDF to Excel
 Organize PDF
 Merge PDF
 Split PDF
 Crop PDF
 Rotate PDF
 Protect PDF
 Sign PDF
 Redact PDF
 Sanitize PDF
 Remove Security
 Read PDF
 UPDF Cloud
 Compress PDF
 Print PDF
 Batch Process
 About UPDF AI
 UPDF AI Solutions
 AI User Guide
 FAQ about UPDF AI
 Summarize PDF
 Translate PDF
 Chat with PDF
 Chat with AI
 Chat with image
 PDF to Mind Map
 Explain PDF
 Scholar Research
 Paper Search
 AI Proofreader
 AI Writer
 AI Homework Helper
 AI Quiz Generator
 AI Math Solver
 PDF to Word
 PDF to Excel
 PDF to PowerPoint
 User Guide
 UPDF Tricks
 FAQs
FAQs UPDF Reviews
 Download Center
 Blog
Blog Newsroom
 Tech Spec
 Updates
 UPDF vs. Adobe Acrobat
 UPDF vs. Foxit
 UPDF vs. PDF Expert
So, you’ve spent hours creating a Pages document. Now it's time to share it with your team or friends. The only catch? Pages files are exclusive to Apple devices! So, how can you make them accessible on other platforms?
Converting them to PDF is your answer!
But If you don’t know how to convert Pages to PDF on iPhone, don’t worry. This article will guide you through it using built-in iOS tools and an online platform.
If you need to edit your converted PDF, you can do so easily with UPDF. Download it now for an effortless way to handle PDFs right on your smartphone.
Windows • macOS • iOS • Android 100% secure
Now, let’s get started.
Part 1. Convert Pages to PDF on iPhone via Exporting
You can use the Export option in your Pages app to quickly convert a Pages file into a PDF. This option is easily accessible and offers a straightforward solution.
Here’s how it works.
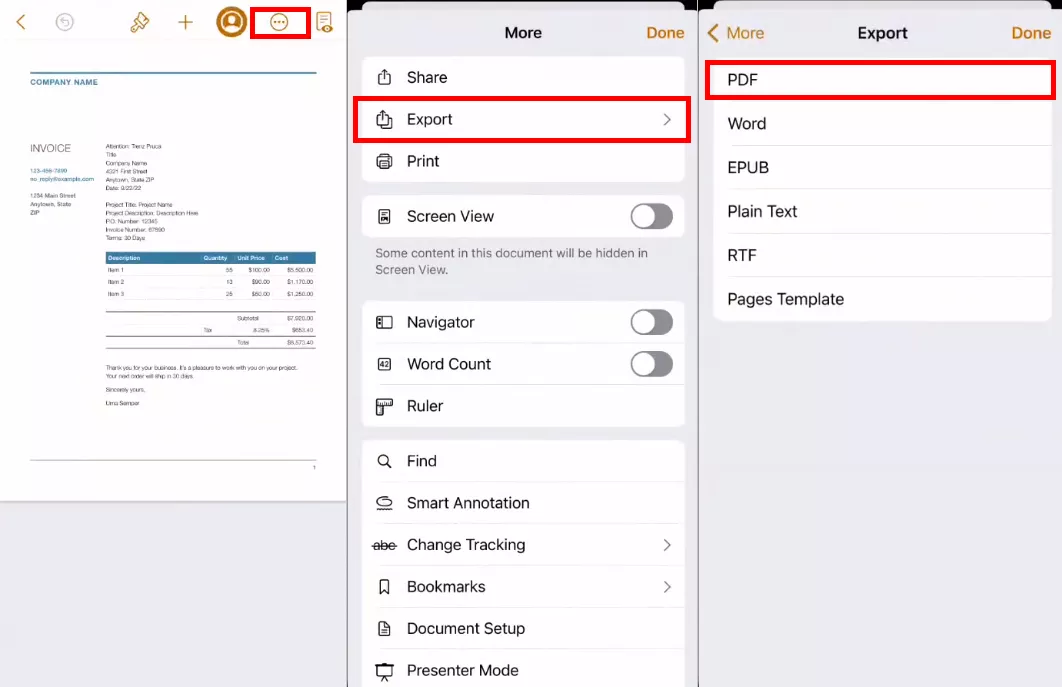
Step 1: Open the Pages app and tap your document to open it.
Step 2: Tap the three horizontal dots at the top right. Then tap “Export” from the popup menu.
Step 3: Select the “PDF” option and tap “Share” on the next screen.
Step 4: Press “Save to Files” to convert Pages to PDF and save it on your device.
That’s how to change Pages to PDF on an iPhone by exporting! Now, let’s explore another solution for it.
Also Read: How to Delete Pages from PDF on iPhone? (Step by Step Guide)
Part 2. Convert Pages to PDF on iPhone via Printing
You can also use the Print option to change Pages to PDF on iPhone. This option lets you customize the PDF output by selecting a specific page range, orientation, size, and more.
Here’s how it works!
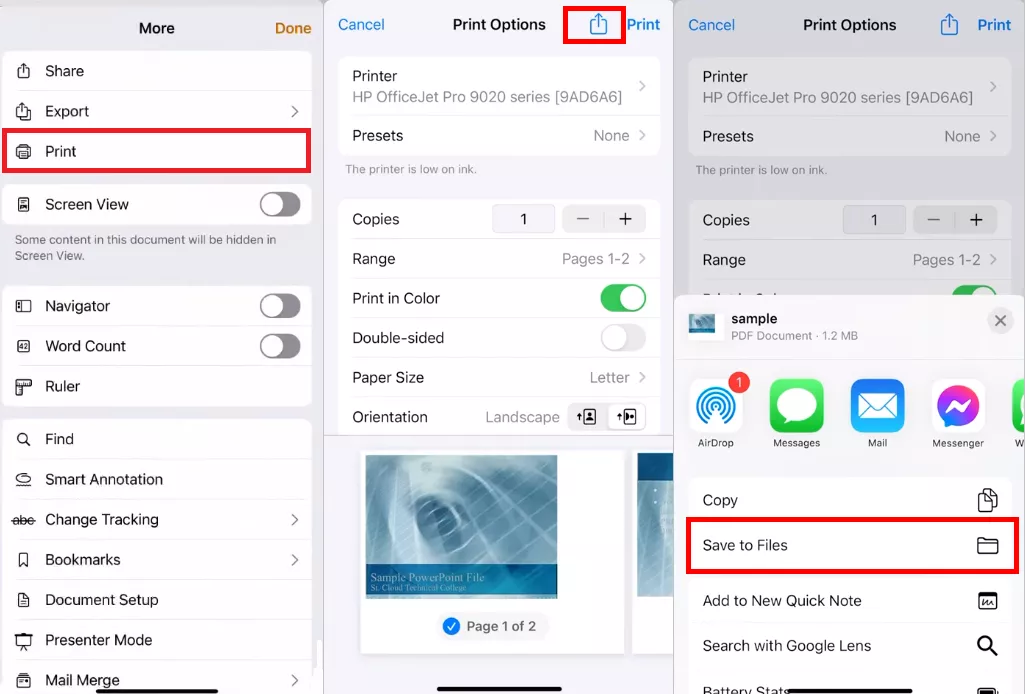
Step 1: Go to the Pages app and tap your document to view it. Then, tap the three horizontal dots in the top right.
Step 2: Select “Print” from the menu. Then, customize the settings, such as the page range, color, orientation, etc.
Step 3: Tap the “Share” icon near the top right and select “Save to Files.” The converted PDF will be stored on your iPhone.
Part 3. Convert Pages to PDF on iPhone via CloudConvert
Another way to create a PDF from Pages is to use an online file converter like CloudConvert. You can access the platform through any browser, including Chrome and Safari.
Here’s how to change Pages to PDF on iPhone using it.
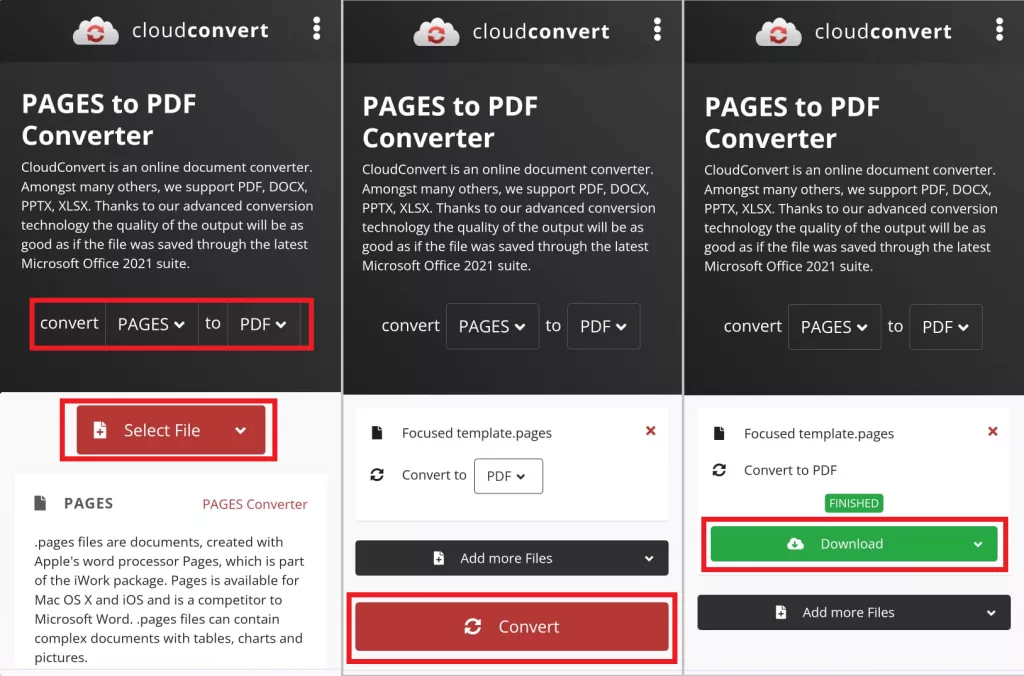
Step 1: Go to CloudConvert’s website on your iPhone. Then, tap the “convert” dropdown.
Step 2: Select “Document” from the categories. Then, choose “PAGES” from the listed formats.
Step 3: Tap the dropdown for “to” and choose the “PDF” format. Press the “Select File” button and import your .pages file.
Step 4: Tap “Convert” to start the conversion. Once the file is processed, tap “Download” to store it on your device.
That’s how to convert Pages to PDF on iPhone! Want to know an easy way to edit your PDF post-conversion? Keep reading!
Part 4. Bonus Tip: How to Edit the Converted PDF?
Do you want to make corrections or update your PDF after converting? UPDF for iOS offers an easy solution! It is your one-stop solution to edit all aspects of PDFs right on your iOS device. Whether you need to edit existing content or add new one, UPDF makes it possible!
Why choose it? Here are some key benefits.
- Edit All Elements of PDF: Edit existing text, images, links, watermarks, and more, just like in the Pages app!
- Add New Content: Easily Update PDFs with new text, images, links, stamps, stickers, and more.
- Protect the Edited Files: Upload edited PDFs to security space and protect them with a passcode or Face ID.
- Handle PDFs with AI: Easily summarize, translate, explain, rewrite, and chat with PDFs using UPDF’s AI assistant.
Ready to edit your converted PDF? Download UPDF’s iOS app on your device via the below button or the App Store. Then, use the following steps to get started.
Windows • macOS • iOS • Android 100% secure
Step 1: Open UPDF and tap the “+” icon. Then, select “Files” to import your PDF from your iPhone.
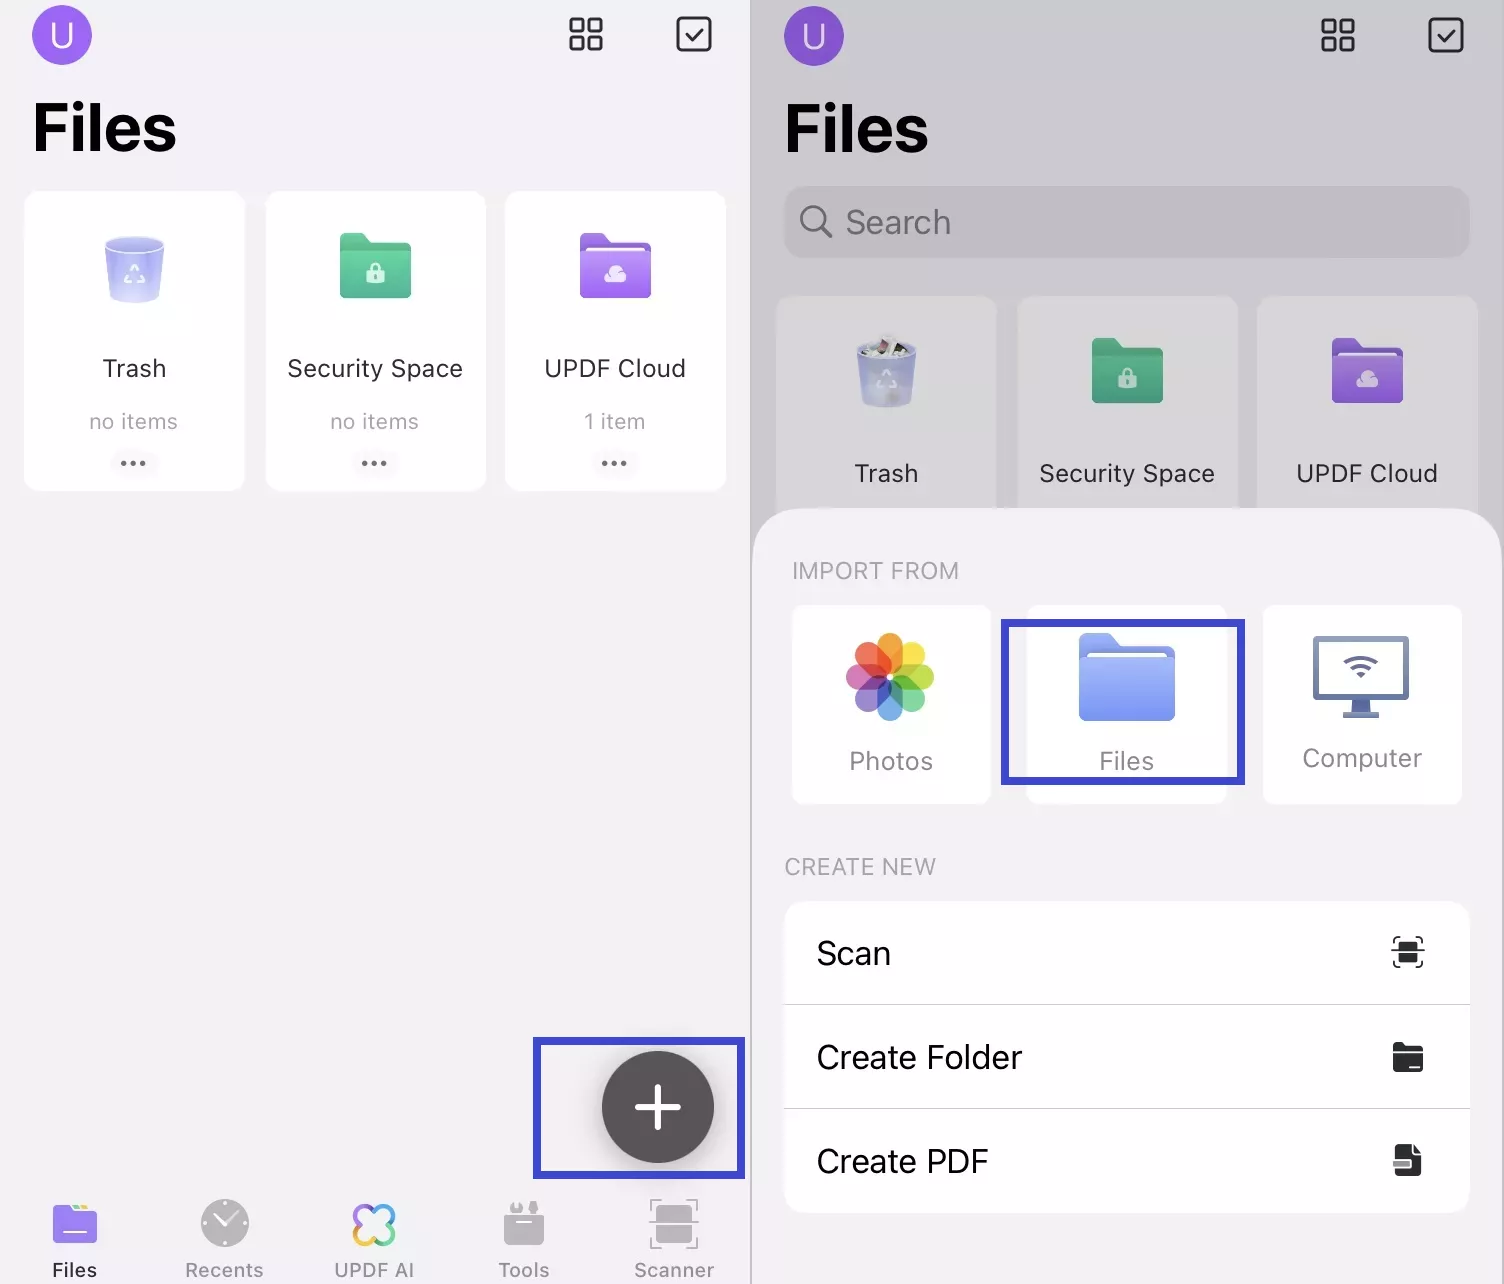
Step 2: Select the “Text and image” icon in the top right. Tap any text and choose “Edit” from the toolbar. Now, you can delete, add, copy, cut or replace text.
Step 3: Choose “Properties” from the toolbar to adjust the text's size, style, color, and alignment.
Step 4: Select the “T” icon from the bottom to add new text. Tap anywhere on the PDF page to add a text box. Then, type in your desired text.
Step 5: Use the options from the bar above your keyboard to change the text color, size, style and alignment.
Step 6: Select the “Image” icon from the bottom toolbar to add a new image. Select from the Photos, Files, Scan, or Camera options to import your image.
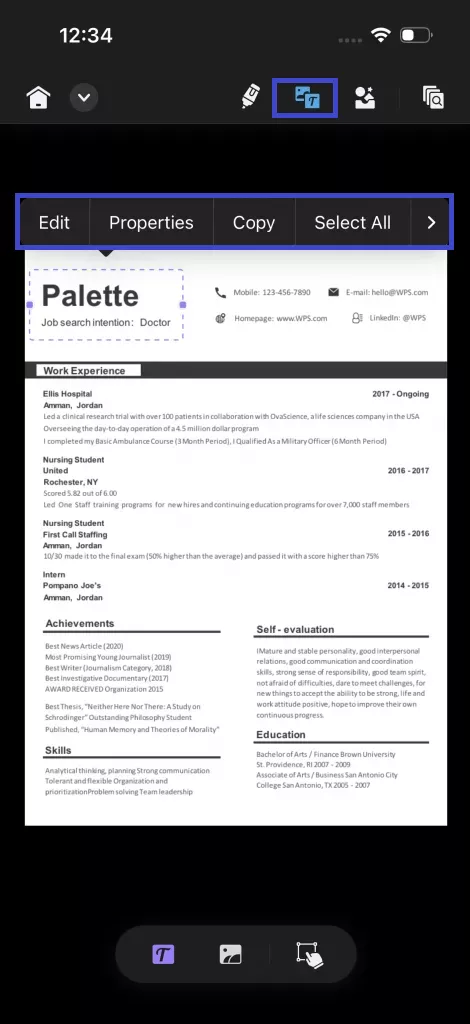
Step 7: Tap the image to edit. A toolbar with various options will appear. Select how to edit the PDF image from the copy, delete, rotate, crop, extract, and replace options.
UPDF makes it easy to edit PDFs right on your iPhone. You can also use it on iPad, Mac, Windows, and Android. The best part? You can use one premium license to use UPDF on any platform! So, don’t wait. Get UPDF now for a seamless solution to handle PDFs anytime, anywhere!
If you want to learn more about UPDF before upgrading, watch the video below. You can also read this UPDF review to explore its iOS features.
Final Words
That’s all about how to convert Pages to PDF on iPhone! You can use the built-in Export and Print option or an online platform like CloudConvert. And if you want to give your documents a professional look, UPDF is available right on your iOS device! Download and try it. Experience rich editing tools to efficiently handle all elements of your PDFs!
Windows • macOS • iOS • Android 100% secure


 Enrica Taylor